安装 axios
Siona
一、安装 axios
1. 安装 axios
npm install axios
# or
yarn add axios
二、请求方式
1. GET 请求
/**
 * 获取数据
 */
// 两种声明方式
// const getList = async () => {}
async function getList() {
    let resData = {}

    let url = "xxxx"
    let params = {
        "id": id
    }
    await axios.get(url, {params: params})
        .then(response => {
            if (response.data.code === 200) {
                console.log(response.data.data)
                resData = response.data.data
            } else {
                console.log("调用接口失败", response.data)
            }
        })
    return resData
}
举例
const fileListData = ref([])
// 加载文件列表(分页)
const getFileList = (nodeId) => {
    let url = BackendUrl.FileManagement + "/file/list"

    let params = {
        "folderId": nodeId,
        "keyword": searchInput.value,
        "pageNum": paginationConfig.value.current,
        "pageSize": paginationConfig.value.defaultPageSize,
    }

    axios.get(url, {params: params})
        .then(response => {
            if (response.data.code === 200) {
                // console.log(response.data.data)
                fileListData.value = []

                response.data.data.list.forEach(item => {
                    let obj = {}
                    obj.key = item.id;
                    obj.fileName = item.documentName;
                    obj.fileSize = item.fileSize;
                    obj.fileType = item.fileType;
                    obj.updateTime = item.updateTime;

                    fileListData.value.push(obj)
                });
                paginationConfig.value.total = response.data.data.total;
                paginationConfig.value.current = response.data.data.pageNum;
                paginationConfig.value.defaultPageSize = response.data.data.pageSize;

            }
        });
}
2. POST 请求
(1)form-data
// formData 数据
axios.post(url, params, {
    headers: {
        'Content-Type': 'multipart/form-data', // 设置请求头
    }
}).then(response => {
    if (response.data.code === 200) {
        console.log(response.data.data)
    }
});
(2)json
// json 数据
let url = "xxxx"
let params = {
    "id": id
}
axios.post(url, params)
    .then(response => {
        if (response.data.code === 200) {
            console.log(response.data.data)
        }
    })
    .catch((error) => {
        console.error(error)
    })
📢 注意:
- get 请求 →
{params: params} - post 请求 →
params - 具体可以查看 get 、post 方法中的参数
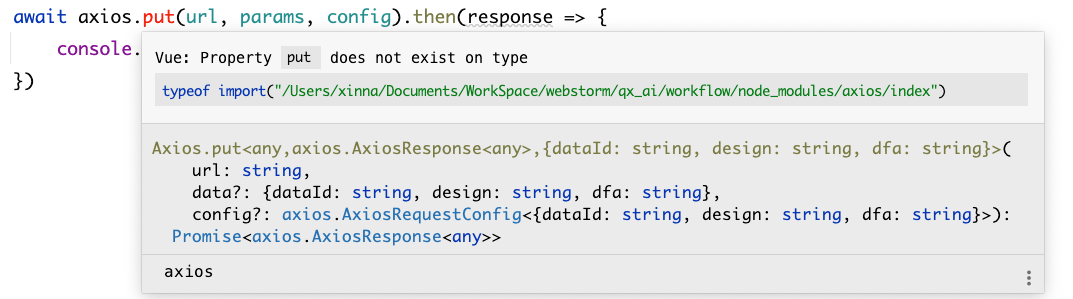
3. PUT 请求
let url = "xxxx"
let params = {
    "id": id
}

// 设置请求头信息
const headers: Record<string, string> = {
    'Content-Type': 'application/json',
    'Authorization': 'Bearer YOUR_ACCESS_TOKEN' // 如果需要身份验证,替换为实际的访问令牌
};

axios.put(url, params, {headers: headers})
    .then(response => {
        console.log(response)
    })
    .catch((error) => {
        console.error(error)
    })
举例
/**
 * 修改部门
 * @param org 部门信息 obj
 */
async function updateOrganization(org) {

    let resData = {}

    let url = BackendUrl.JYServer + "/department/update"

    let params = {
        id: org.id,
        name: org.orgName,
        updater: org.updater,
    }

    await axios.put(url, params)
        .then(response => {
            if (response.data.code === 200) {
                // console.log(response.data.data)
                ElMessage({
                    type: 'success',
                    message: `修改成功`,
                })
                resData = response.data.data
            } else {
                ElMessage({
                    type: 'error',
                    message: `修改失败, ${response.data}`
                })
            }
        })
    return resData
}


// 调用

async function test() {
    let resData = await updateOrganization(org);
}
- axios 返回值是异步操作,获取返回值时,请求操作还未完成,就已经执行了赋值,导致结果为
undefined。 async声明方法为异步方法,await等待异步操作执行完毕。
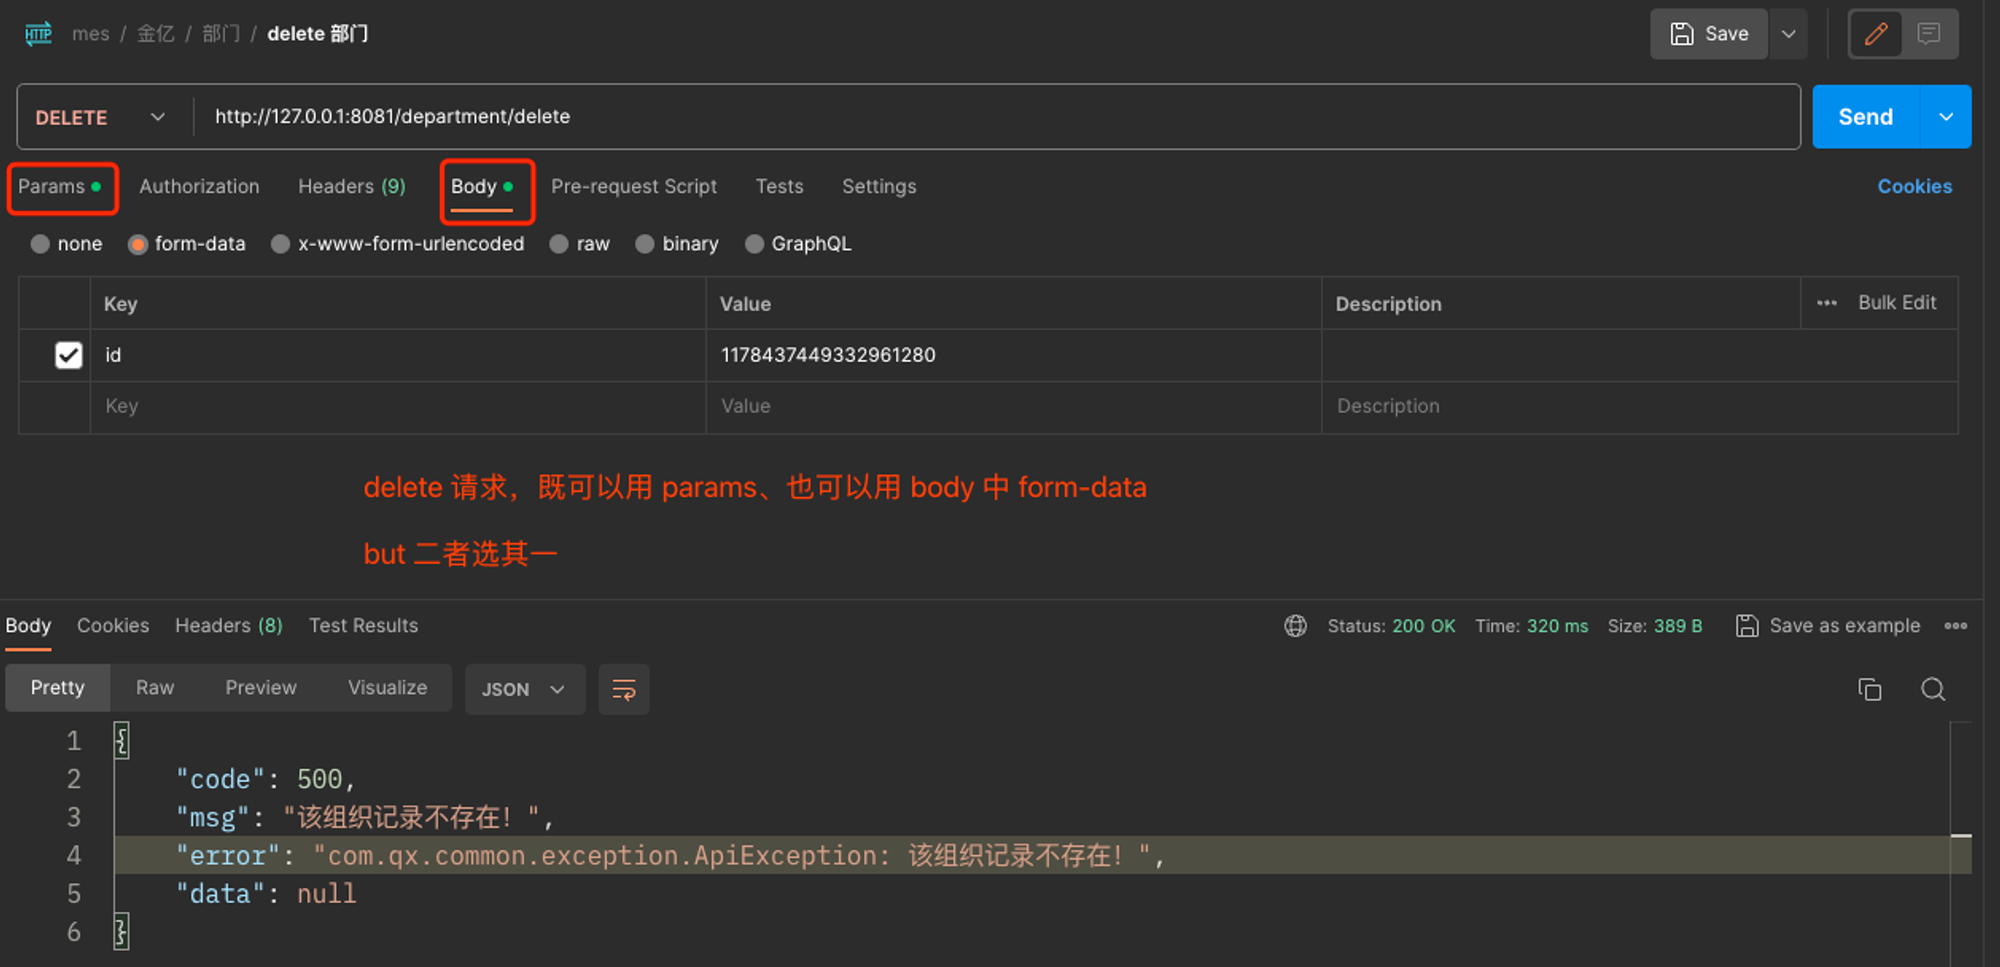
4. DELETE 请求
举例
/**
 * 删除部门
 * @param orgId 部门Id
 */
const deleteOrganization = (orgId) => {

        let url = BackendUrl.JYServer + "/department/delete"

        let params = {
            id: orgId
        }

        axios.delete(url, {params: params})
            .then(response => {
                if (response.data.code === 200) {
                    // console.log(response.data.data)
                    ElMessage({
                        type: 'success',
                        message: `删除成功`,
                    })
                    // delete 成功之后,重新加载列表
                    getOrganizationList();
                } else {
                    ElMessage({
                        type: 'error',
                        message: `修改失败, ${response.data}`
                    })
                }
            })
    }
请求头方式不成功,解决办法:
/**
 * 删除部门
 * @param org 部门信息
 */
const deleteOrganization = async (org) => {
        let flag = false

        let url = BackendUrl.ERPServer + "/api/department"

        // 请求头
        let headers = {
            'Authorization': org.creator,
        }

        let params = {
            data_id: org.id
        }

        await axios.delete(url, {data: params, headers: headers})
            .then(response => {
                if (response.data.message === 'ok') {
                    // console.log(response.data.data)
                    ElMessage({
                        type: 'success',
                        message: `删除成功`,
                    })
                    flag = true
                } else {
                    ElMessage({
                        type: 'error',
                        message: `删除失败, ${response.data}`
                    })
                }
            })
        return flag
    }
注意:config 参数
let config: {
    data: data,     // json,请求参数放在请求体中
    params: params,  // form-data,请求参数拼接在 url 上
    headers: headers,  // 请求头
}
其他相关
1. 服务端 IP 配置类
// src/api/backend.ts → 后端 IP

export default class BackendUrl {

    // 文件管理系统
    // static FileManagement = "http://127.0.0.1:8013";
    static FileManagement = "http://121.37.171.001:10044/dms";


    // 文件预览系统
    // static FilePreview = "http://127.0.0.1:8012";
    static FilePreview = "http://121.37.171.001:10044/kkFileView";

}
// 使用
import BackendUrl from "@/api/backend";

let url = BackendUrl.FileManagement + "/menu/add"	// api 地址
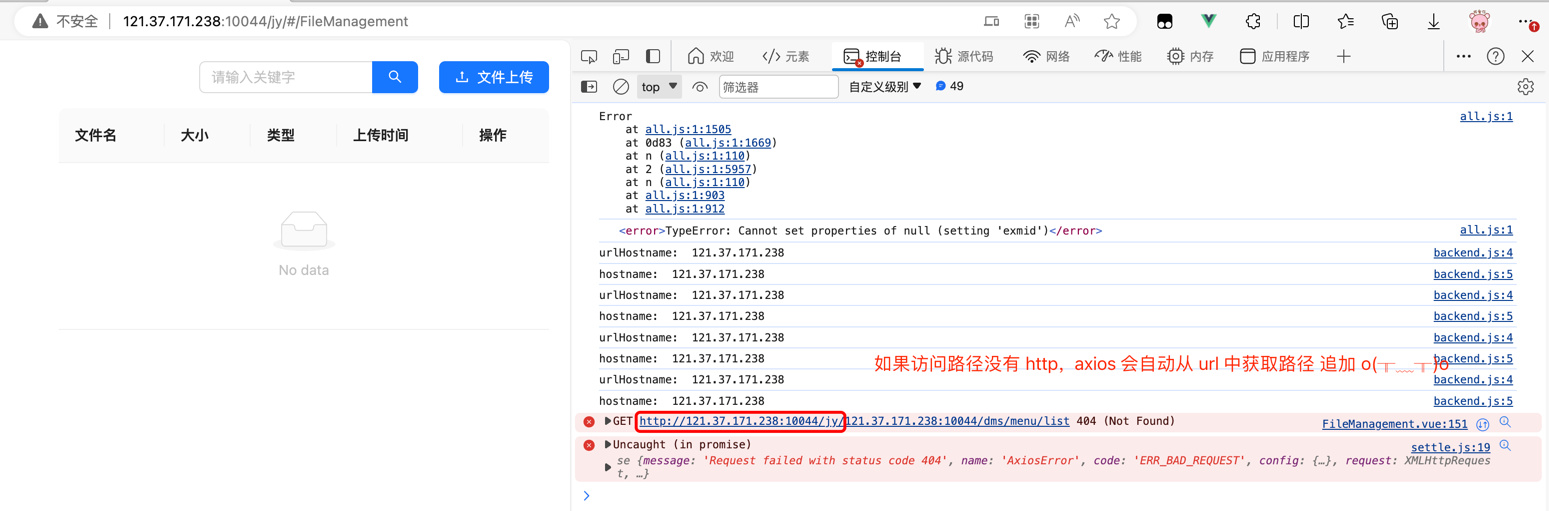
2. 报错
3. 从 url 中动态获取 IP 地址
function getBaseUrl() {
    const urlProtocol = window.location.protocol;
    const urlHostname = window.location.hostname;
    const url = urlProtocol + "//" + urlHostname;
    return (urlHostname === 'localhost' || urlHostname === '127.0.0.1') ? process.env.VUE_APP_API_BASE_URL : url;
}

export default class BackendUrl {

    // 文件管理
    // static FileManagement = "http://127.0.0.1:8013";
    static FileManagement = getBaseUrl() + ":10044/dms";

    // 文件预览系统
    // static FilePreview = "http://127.0.0.1:8012";
    static FilePreview = getBaseUrl() + ":10044/kkFileView";

    // 金亿 MES 系统
    // static JYMesSystem = "http://127.0.0.1:8098"
    static JYMesSystem = getBaseUrl() + ":10044/jyServer";

    // gea 服务 api baseUrl
    static GEABaseUrl = getBaseUrl() + ":10042/gea";

    // erp
    static ERPServer = getBaseUrl() + ":10042/erp"

    // 低代码平台
    static LowCodeServer = getBaseUrl() + ":18080"
}
# .env
NODE_ENV=development
VUE_APP_API_BASE_URL=http://121.37.171.001

# 使用,本地环境自动识别
# .env.product
NODE_ENV=production
VUE_APP_PREVIEW=true
VUE_APP_API_BASE_URL=http://121.37.171.001

# 使用
console.log(process.env.VUE_APP_API_BASE_URL)

# 生产环境运行
"scripts": {
    "serve": "vue-cli-service serve",
    "build": "vue-cli-service build --mode product",
},
axios 常见用法
declare class Axios {
    constructor(config?: axios.AxiosRequestConfig);
    defaults: axios.AxiosDefaults;
    interceptors: {
        request: axios.AxiosInterceptorManager<axios.InternalAxiosRequestConfig>;
        response: axios.AxiosInterceptorManager<axios.AxiosResponse>;
    };
    getUri(config?: axios.AxiosRequestConfig): string;
    request<T = any, R = axios.AxiosResponse<T>, D = any>(config: axios.AxiosRequestConfig<D>): Promise<R>;
    get<T = any, R = axios.AxiosResponse<T>, D = any>(url: string, config?: axios.AxiosRequestConfig<D>): Promise<R>;
    delete<T = any, R = axios.AxiosResponse<T>, D = any>(url: string, config?: axios.AxiosRequestConfig<D>): Promise<R>;
    head<T = any, R = axios.AxiosResponse<T>, D = any>(url: string, config?: axios.AxiosRequestConfig<D>): Promise<R>;
    options<T = any, R = axios.AxiosResponse<T>, D = any>(url: string, config?: axios.AxiosRequestConfig<D>): Promise<R>;
    post<T = any, R = axios.AxiosResponse<T>, D = any>(url: string, data?: D, config?: axios.AxiosRequestConfig<D>): Promise<R>;
    put<T = any, R = axios.AxiosResponse<T>, D = any>(url: string, data?: D, config?: axios.AxiosRequestConfig<D>): Promise<R>;
    patch<T = any, R = axios.AxiosResponse<T>, D = any>(url: string, data?: D, config?: axios.AxiosRequestConfig<D>): Promise<R>;
    postForm<T = any, R = axios.AxiosResponse<T>, D = any>(url: string, data?: D, config?: axios.AxiosRequestConfig<D>): Promise<R>;
    putForm<T = any, R = axios.AxiosResponse<T>, D = any>(url: string, data?: D, config?: axios.AxiosRequestConfig<D>): Promise<R>;
    patchForm<T = any, R = axios.AxiosResponse<T>, D = any>(url: string, data?: D, config?: axios.AxiosRequestConfig<D>): Promise<R>;
}
使用 axios.request({config 配置})
/**
 * 删除部门
 * @param org 部门信息
 */
const deleteOrganization = async (org) => {

        let url = BackendUrl.ERPServer + "/api/department"

        // 请求头
        let headers = {
            'Authorization': org.user,
        }

        // json 格式传参 -> 请求体
        let data = {
            data_id: org.id
        }

        // form-data 格式传参 -> url 上
        let params = {
            data_id: org.id
        }

        // 注意,按实际业务场景选择相应的 config 参数
        await axios.request({
            url: url,
            method: 'delete',
            headers: headers,
            params: params,
            data: data,
        }).then(response => {
            if (response.data.message === 'deleted') {
                // console.log(response.data.data)
                ElMessage({
                    type: 'success',
                    message: `删除成功`,
                })
            } else {
                ElMessage({
                    type: 'error',
                    message: `删除失败, ${response.data}`
                })
            }
        })
    }
使用 axios.delete()
// 根据上述代码修改,部分代码
await axios.delete(url, {
    headers: headers,
    data: data
})